Fix the environment immediately, then decide whether to restart
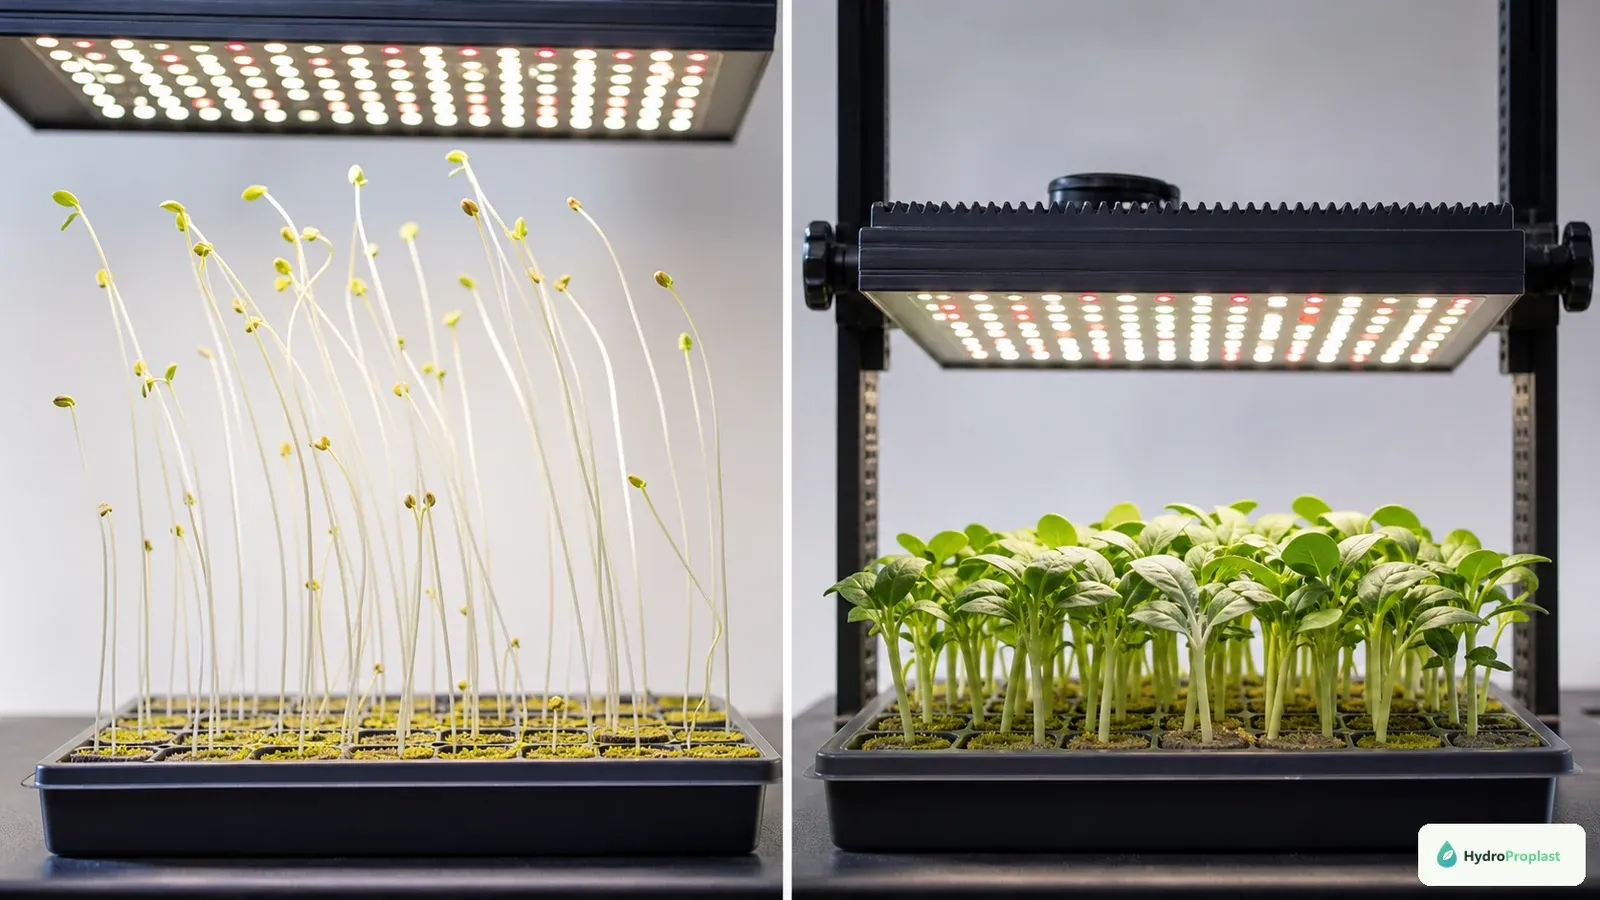
Leggy seedlings have elongated, thin stems and wide spacing as they stretch toward inadequate or poorly positioned light. Increase usable light promptly, correct fixture distance and coverage, provide an appropriate dark period, reduce excessive post-emergence heat, and improve gentle airflow. Existing stretched stem will not become shorter; the goal is compact new growth.
Mildly stretched seedlings may recover with support and better conditions. Severely pale, collapsed, damaged, or diseased seedlings are often better replaced, especially before they enter a shared hydroponic system. Restarting a fast crop can be quicker than managing a weak plant through harvest.
University of Minnesota Extension’s indoor seed-starting guide identifies lack of light as a major cause of elongated skinny stems and recommends close adjustable lighting with a nightly dark period.
Confirm legginess rather than another problem
Low-light seedlings lean or reach toward the brightest direction, have long internodes, small pale leaves, and stems unable to support the top. Entire trays often show the pattern, with edge differences tied to fixture coverage.
Damping off creates a pinched or discolored stem at the medium line and collapse, sometimes with fungal growth. Nutrient problems, saturated roots, heat, and crowding can also create weak seedlings. Supporting a diseased stem does not solve the infection.
Inspect roots, stem base, plug moisture, leaf color, and distribution across the tray. If only one cell fails, seedling damage or root disease may be more likely than room-wide light shortage.
Why a bright window may still be insufficient
Human eyes adapt to dim rooms, so a window appears brighter than the light seedlings receive over the full day. Clouds, roof overhang, glass, season, and distance reduce usable light. Light from one side also encourages leaning.
The University of Minnesota’s indoor plant lighting guide describes leggy growth under insufficient light and recommends evaluating both light quality and duration. Supplemental LED lighting can make delivery more consistent.
Place seedlings under the light as soon as green shoots emerge. Waiting until stems stretch loses structure that cannot be reversed.
Correct fixture distance safely
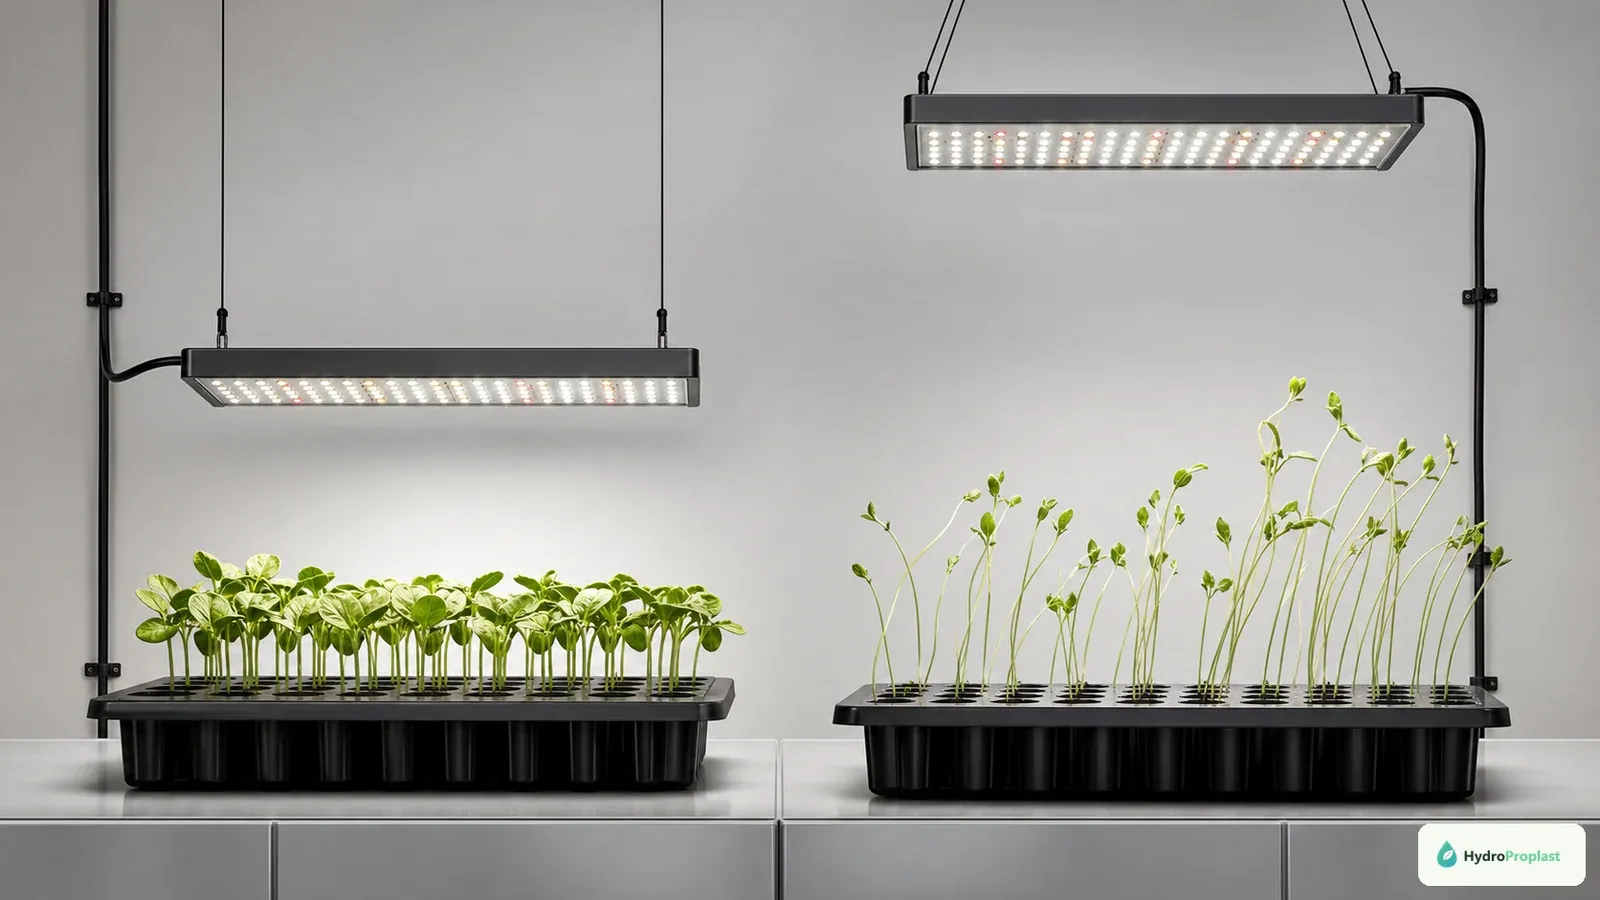
Adjust fixture height and footprint together so seedlings receive useful, even light without heat stress.
Move the lamp closer only within manufacturer and crop guidance. Fixture power, optics, heat, and canopy area differ, so one universal distance is unsafe. Check the corners as well as the center.
Raise the light as seedlings grow, keeping a consistent gap. A hanging system with marked positions makes adjustment repeatable. If center plants remain compact while edge plants lean, improve coverage or reduce tray width rather than lowering the lamp until the center scorches.
Observe bleaching, curled leaves, dry plugs, or excessive leaf temperature as signs that intensity or heat may be too high.
Duration cannot fully replace intensity
Running a weak light for more hours does not always provide the same plant response as adequate intensity, and seedlings still need a dark period. Use a timer and follow crop guidance.
If lights are already operating for an appropriate duration, evaluate fixture output, distance, coverage, and age before extending the day. Clean dust from lenses or covers with power isolated and according to manufacturer instructions.
Record both hours and physical setup. “Grow light on” is not enough to reproduce success.
Heat can accelerate stretching
Warmth helps many seeds germinate, but maintaining high bottom heat after emergence can promote rapid elongation when light cannot support compact growth. Remove or reset heat mats according to crop guidance once shoots emerge.
Measure plug and air temperature, not thermostat labels alone. A covered tray beneath lamps can become much warmer than the room. Vent or remove humidity domes promptly after emergence unless crop instructions differ.
Do not chill seedlings abruptly. Match post-emergence temperature to the crop and maintain adequate light.
Air movement strengthens but does not replace light
Gentle airflow encourages sturdier growth and reduces stagnant humidity. Position a clean fan so leaves move slightly. Strong wind can dry plugs, cool seedlings unevenly, or physically bend tender stems.
Air movement cannot correct energy shortage. A fan on a dark tray produces stressed moving seedlings. Address light first, then use airflow as part of a balanced environment.
Keep fans and electrical connections away from water. Clean blades so dust is not blown across wet media.
Crowding and competition
Several seedlings in one plug shade and compete with one another. Thin by cutting unwanted stems at the medium surface once the keeper is identifiable. Pulling can damage intertwined roots.
Space trays so leaves do not form a dense roof. Rotate only to correct minor fixture asymmetry; daily rotation should not be necessary in a well-lit setup.
Do not fill every hydroponic site with a weak seedling merely because it germinated. Uniform healthy transplants make nutrient and flow problems easier to diagnose.
Nutrient strength is not a light fix
Seeds use stored reserves during early emergence. After true leaves develop, a mild complete hydroponic nutrient may be appropriate. Excess fertilizer does not make a low-light stem stronger and can injure young roots.
If pale seedlings improve slowly after lighting is corrected, inspect roots, pH, moisture, and true-leaf stage before feeding more. Measure working volume and follow seedling-specific product guidance.
The hydroponic nutrient guide separates EC, pH, and nutrient balance from environmental symptoms.
Moisture and root oxygen
Constantly saturated plugs can produce weak roots and stems. Maintain even moisture with drainage and air space. A humidity dome limits evaporation during germination but can keep emerged seedlings too wet.
Lift representative plugs, inspect drain holes, and confirm the tray is not holding standing water. If the surface dries while the base remains saturated, adding more water worsens the lower root zone.
Root browning, odor, or a pinched stem requires sanitation and disease investigation, not only a closer lamp.
Support or restart: a decision rule
Keep a seedling when new growth becomes compact after correction, the stem base is sound, roots are healthy, leaves are adequately green, and the plant can be supported without burying vulnerable tissue.
Restart when the stem is sharply bent or collapsed, disease is suspected, the growing point is damaged, roots are poor, or the crop is fast enough that recovery costs more time than re-sowing. Compare with an extra healthy seedling if available.
Do not move a questionable plant into a shared reservoir. One replacement cell is cheaper than contaminating a connected crop.
Safe temporary support
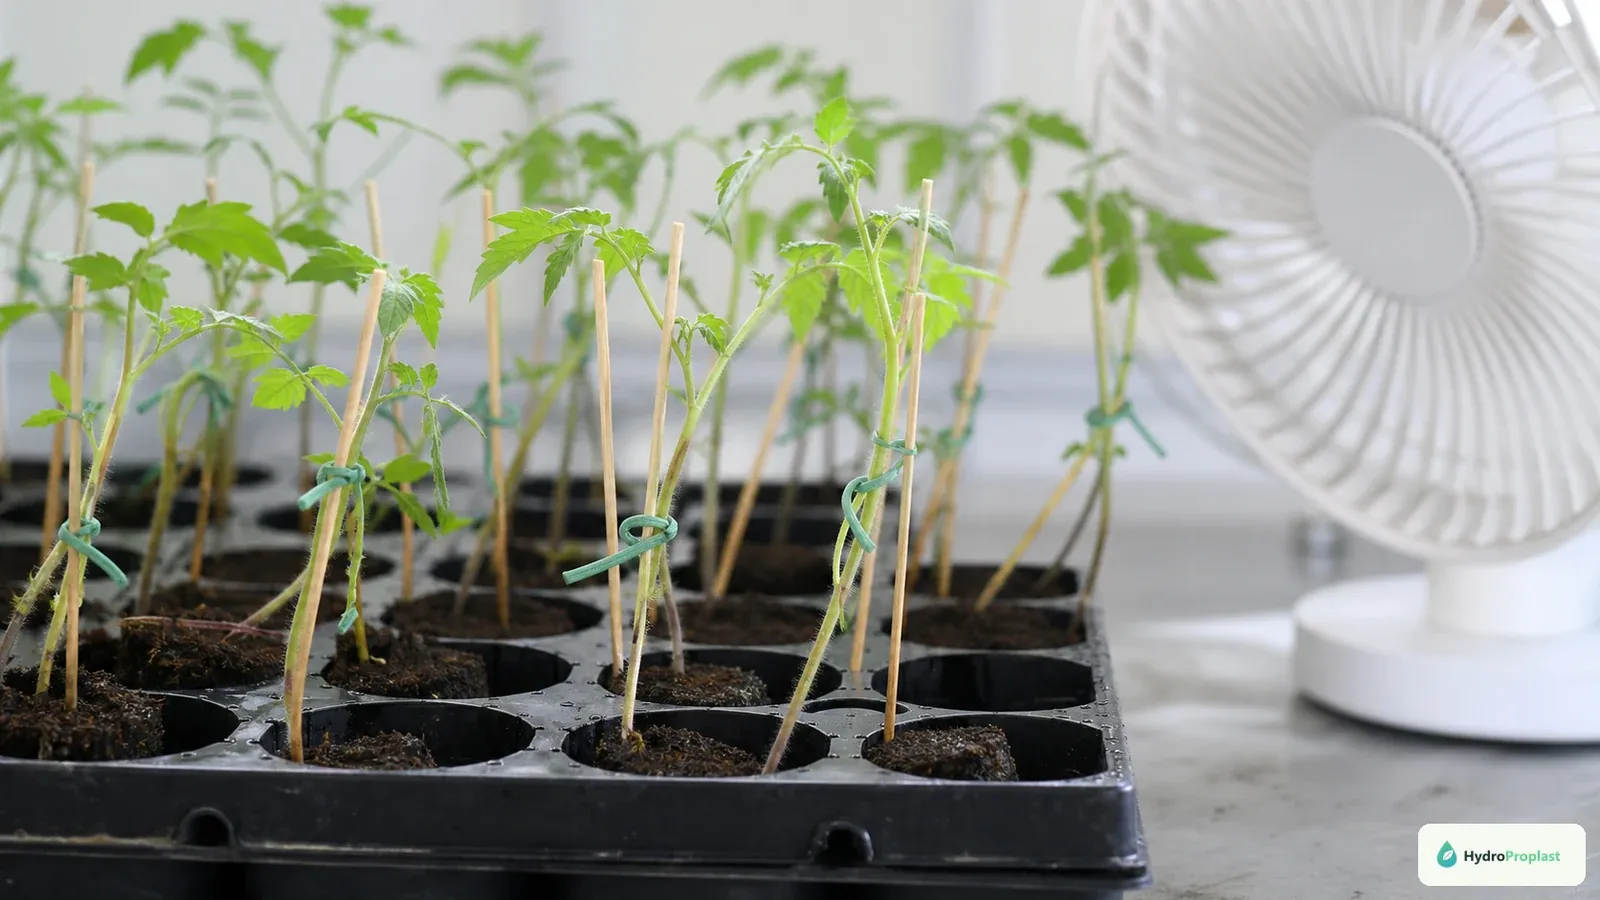
Use gentle airflow and loose supports only after the main environmental cause has been corrected.
Use a clean small stake or loose support that does not constrict the stem. Keep leaves separated and airflow available. Support is temporary while compact growth develops; it should not hide continuing stretch.
Do not tie tightly with wire or wet absorbent material. Inspect daily as stems expand. Net pots and media should support the plug, not clamp the stem.
Some crops tolerate deeper transplanting, notably tomato, while others are more prone to buried-stem rot. Follow crop-specific guidance rather than burying every leggy seedling.
Rebuild the light setup before re-sowing
Measure tray dimensions and fixture coverage. Position the lamp before seeds germinate, test the timer, and mark the correct height range. Check that shelves do not block cooling or create unsafe water-electrical arrangements.
Use the same seed lot and medium for a diagnostic re-sow so light is the main changed variable. Count emergence and photograph seedlings at consistent ages.
The LED grow-light selection guide explains output, coverage, distance, heat, and dimming without relying on “equivalent watts.”
First week recovery audit
Day one: correct light and temperature, inspect roots and moisture, and add gentle airflow. Do not dose extra nutrient automatically.
Days two to four: look for shorter internodes and larger, greener new leaves. Existing stem remains long. Keep support clean and loose.
Days five to seven: compare with healthy reference seedlings of the same age if possible. Evaluate whether the growing point and roots are progressing fast enough to justify a system site.
Record fixture height, schedule, temperature, and changes. Recovery without documentation can be difficult to reproduce.
Transferring a recovered seedling
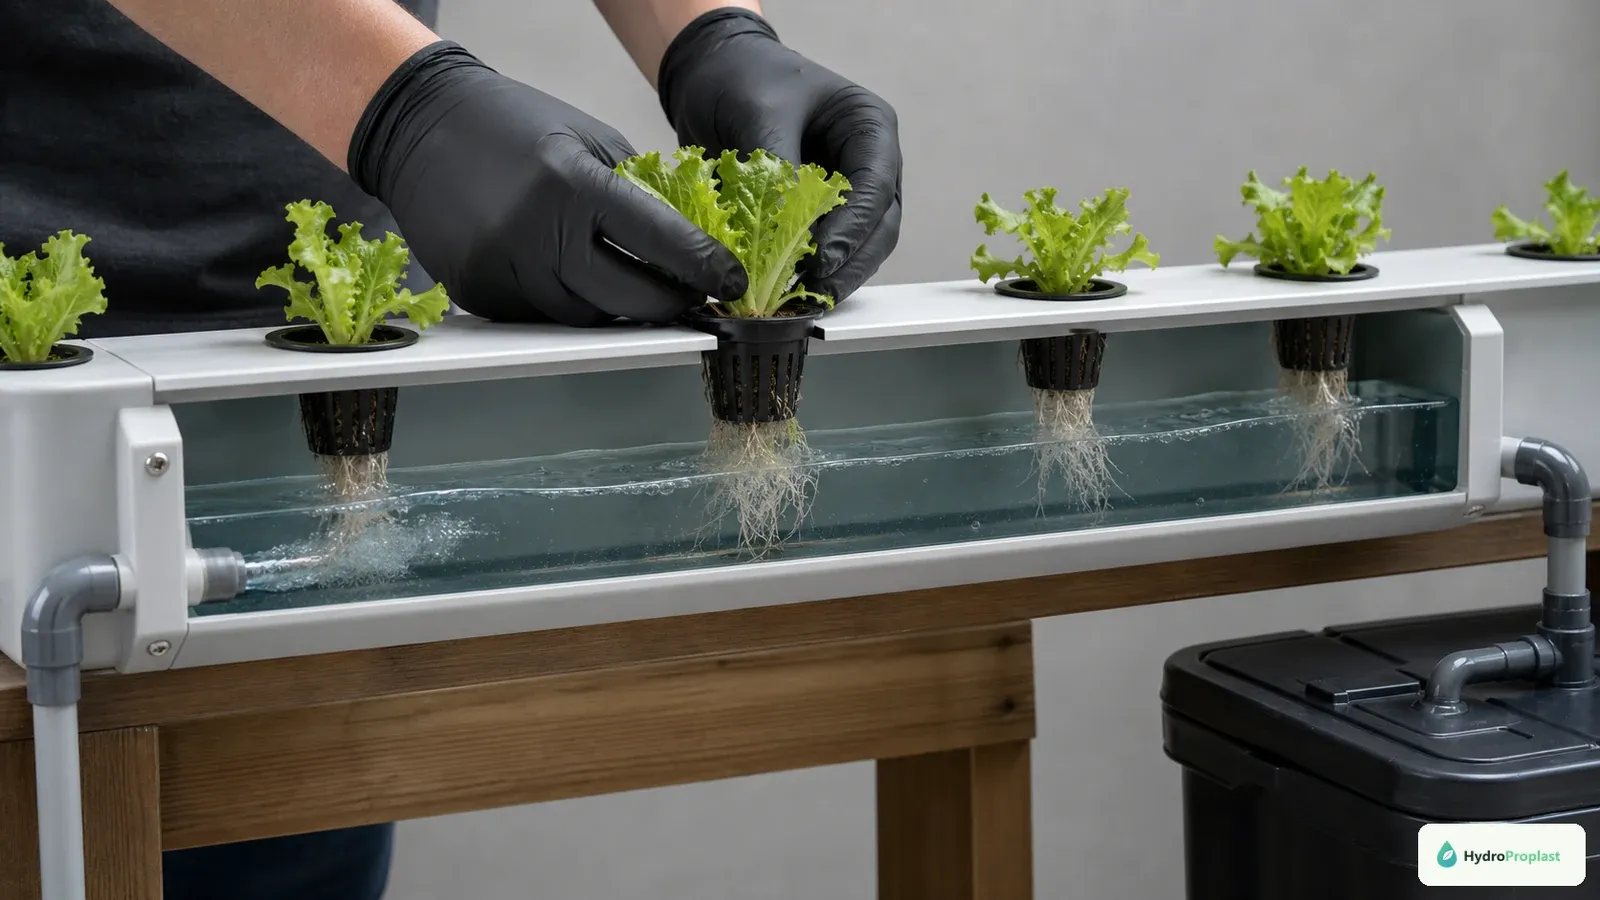
Transfer only seedlings that have resumed compact healthy growth and can be positioned with the crown dry.
Wait until the plug holds together and healthy roots extend outward. Set the net pot so moisture reaches roots without submerging the stem. Keep the final grow light appropriate; moving from a corrected nursery to dim channels will restart stretching.
Avoid strong nutrient or intense light shock on transfer. Verify pH, EC, flow or aeration, and water temperature before moving plants.
Use How to Germinate Seeds for Hydroponics to make the next tray more uniform from sowing through transplant.
Prevent the next stretched tray
Have the lamp, timer, and adjustable hangers operating before sowing. Check trays twice daily around expected emergence. Remove covers and apply crop-appropriate light immediately when shoots appear.
Maintain crop-appropriate post-emergence temperature, thin crowded cells, use clean draining media, and provide gentle airflow. Sow backup cells so discarding a weak plant is an easy decision.
Legginess is primarily an environmental signal. Correcting light promptly and learning from tray-wide patterns is more useful than searching for a fertilizer or support product that claims to reverse stretched tissue.
A focused recovery experiment:
When several seedlings are affected, divide them into small labeled groups instead of changing the entire tray blindly. Keep one group under the current conditions, move one to better measured light, and adjust spacing or airflow for another. Do not simultaneously strengthen nutrients, lower temperature, increase fan speed, and change irrigation; the outcome will reveal nothing.
Photograph from the same position each day and measure the distance from the medium surface to the first leaves. Also note leaf expansion and stem diameter. A recovered seedling may not become shorter, but new internodes should be more compact and the stem should thicken. If new growth remains stretched after light delivery and spacing are corrected, verify the timer, fixture output, canopy distance, and temperature rather than assuming the cultivar is defective.
Crop-specific judgment matters. Tomato seedlings can often be transplanted deeper because buried stems may form additional roots, provided the medium and system design do not leave the crown waterlogged. Lettuce, basil, cucumber, and many plug-grown hydroponic crops should not automatically be buried to hide a long stem. Support them gently and correct the environment for new growth.
Discard seedlings with a constricted, water-soaked, or collapsing stem at the media surface. That pattern can indicate damping-off rather than simple stretching, and keeping infected material beside healthy plugs can worsen losses. Clean trays, reduce persistent surface moisture, improve airflow, and start replacements with fresh material.
Prevention checklist for the next sowing:
Test the light at tray height before seeds emerge. Confirm the timer with an independent observation, not only an app setting. Fill cells uniformly, avoid sowing too densely, label cultivars, and leave enough space for airflow. Keep a daily record of temperature, emergence, watering, and fixture distance. If the first seedlings lean, respond that day; early correction is easier than rebuilding a weak transplant.
The goal is not a perfectly short seedling. It is balanced growth: expanding leaves, a strengthening stem, healthy roots, and compact new internodes suitable for the final hydroponic system.
Recovery versus replacement is also an economic decision. If the crop is fast and seeds are inexpensive, restarting a severely stretched tray may reach harvest sooner than nursing weak plants. If seed is rare or the plant has already produced strong roots, a controlled recovery trial can be worthwhile. Compare expected days lost, available propagation space, and the consequence of an uneven canopy.
After transplant, keep the corrected light environment in place. A compact seedling can stretch again if moved to a dim channel edge. Place the weakest recoverable plants where delivery is measured, label them, and compare their new growth with healthy controls. Do not let sympathy for a damaged seedling compromise an entire production slot.