Microgreens are seedlings harvested after emergence, usually when cotyledons are open and early true leaves may be developing. They are not miniature mature hydroponic plants. The crop is short, dense, eaten close to the growing surface, and highly dependent on seed sanitation, airflow, irrigation, harvest hygiene, and rapid turnover.
Choose seed intended for microgreens
Use untreated seed from a traceable supplier and confirm the species is commonly eaten as a microgreen. Do not use treated garden seed or assume every edible mature plant has safe edible seedlings. Avoid problematic species such as nightshade seedlings.
Check germination percentage, seed size, expected flavor, and supplier food-safety information. Keep lot numbers and storage records.
Start with forgiving crops
Radish, broccoli, kale, mustard, and some peas or sunflowers are common choices, but they differ in seed size, soak practices, density, crop time, and disease risk. Small brassica seed is easier to distribute than large seed that requires more preparation and root space.
Grow one species per tray initially. Mixtures mature unevenly and make diagnosis difficult.
Choose tray and support method
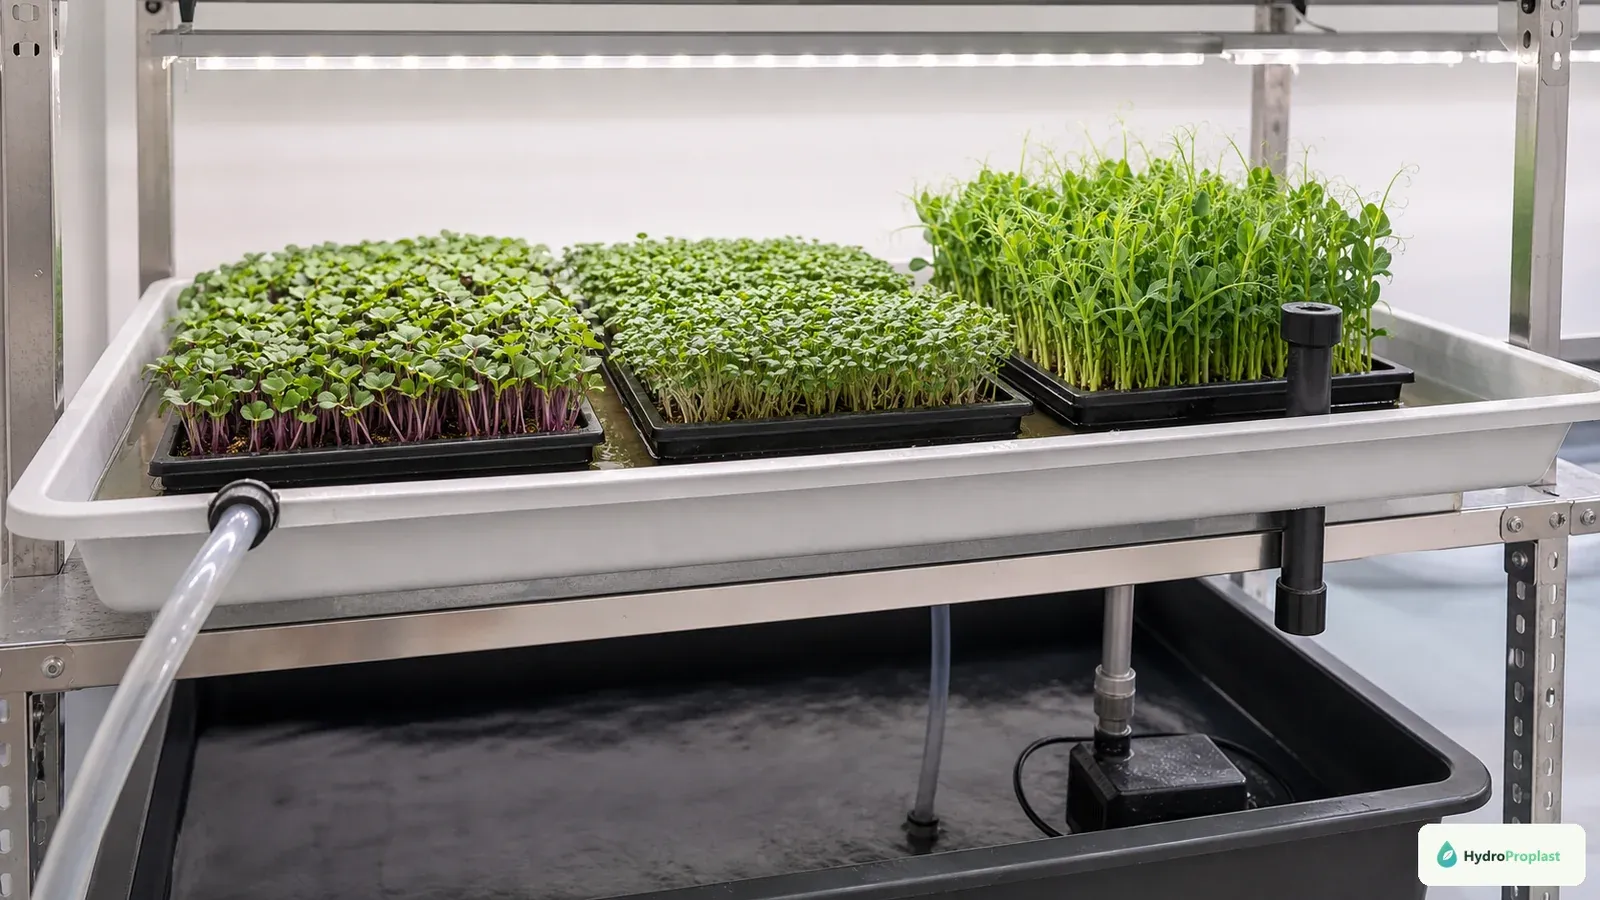
Use food-growing-appropriate trays that are intact, cleanable, and sized for easy handling. A tray with drainage nested in a solid tray supports bottom watering. Mats or shallow soilless media can work when intended for the crop and handled according to supplier directions.
The support must hold moisture without staying anaerobic. The grow-media guide explains air-water tradeoffs, though microgreen trays behave differently from mature plant containers.
Clean before every crop
Remove old roots and media, wash away organic matter, rinse, and use only a sanitizer labeled for the material and food-crop setting when sanitation is required. Follow concentration, contact time, PPE, ventilation, and rinse directions. Never mix chemicals.
Dry or store trays as the procedure requires. The between-crop cleaning guide separates cleaning from sanitizing.
Measure sowing density
Density affects airflow, stem strength, uniformity, and disease. Weigh or count seed for the actual tray area rather than scattering by appearance. Supplier guidance is a starting point; seed size and germination lot matter.
Run a small trial and record dry seed mass, tray dimensions, germination, usable harvest, and rejected patches. Overcrowding cannot be corrected by adding more fan.
Handle soaking by species
Large seeds may benefit from a specified soak; many small seeds do not. Follow supplier or authoritative crop guidance for duration, water, and post-soak handling. Over-soaking can reduce oxygen and increase microbial growth.
Use clean containers and potable water. Drain completely and never reuse soak water on another crop.
Sow evenly
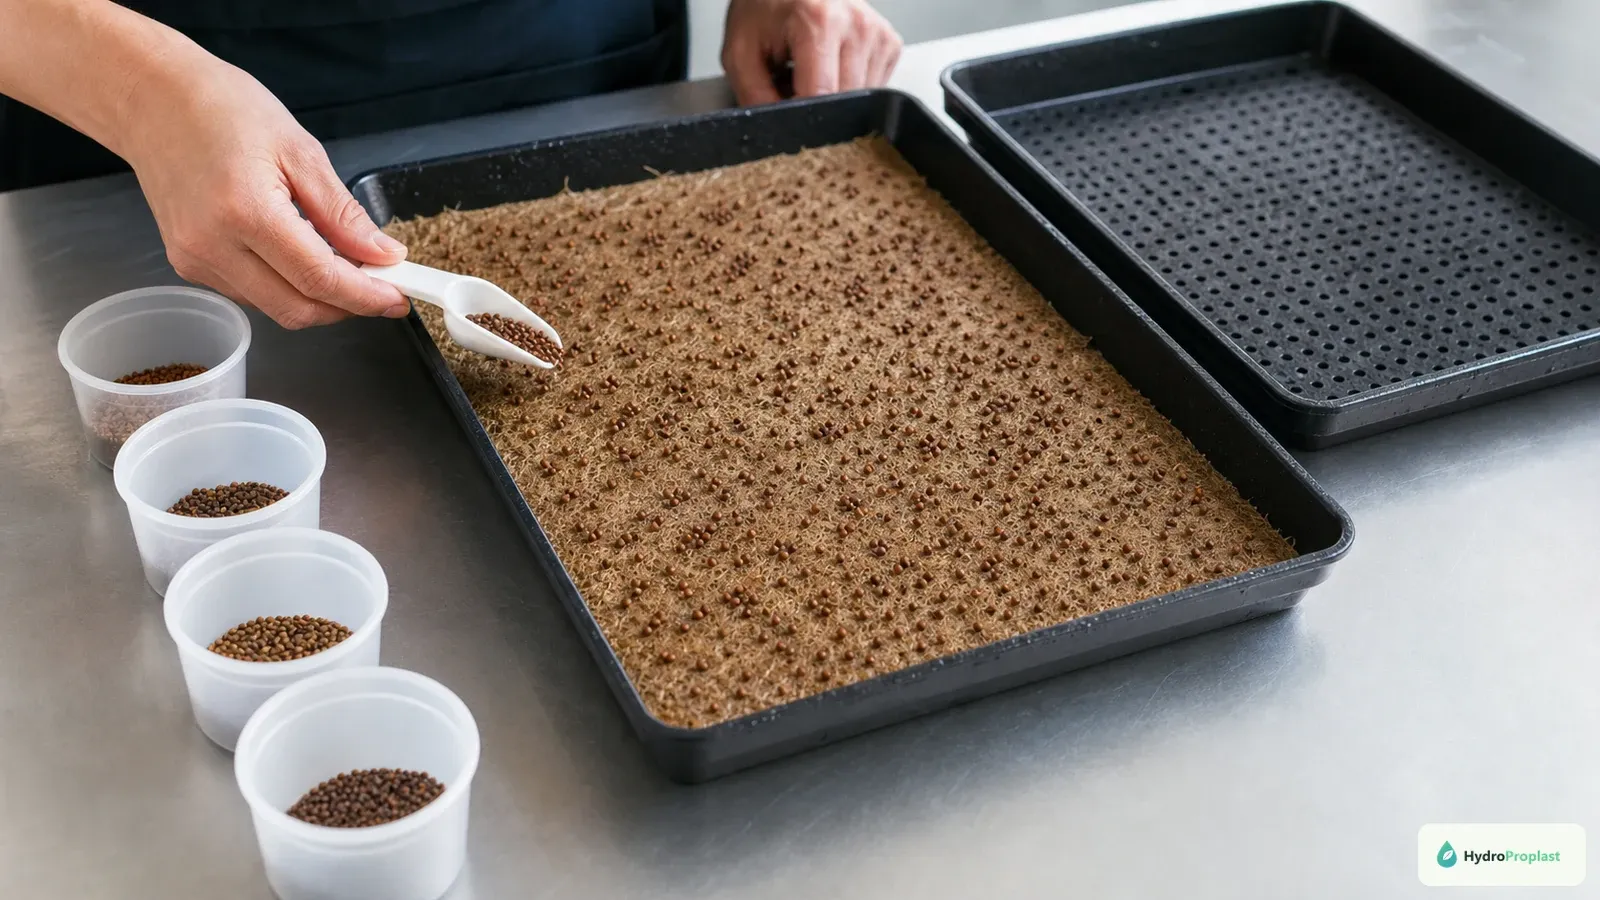
Weigh seed by tray size and spread it evenly so crowded patches do not trap extra moisture.
Level the moistened support and distribute seed uniformly to prevent bare areas and dense wet clumps. Press only as appropriate for seed contact; do not bury every species under a deep layer.
Label crop, cultivar, lot, sowing time, seed mass, and any soak. Keep trays separated so labels cannot move during watering.
Use blackout or stacking deliberately
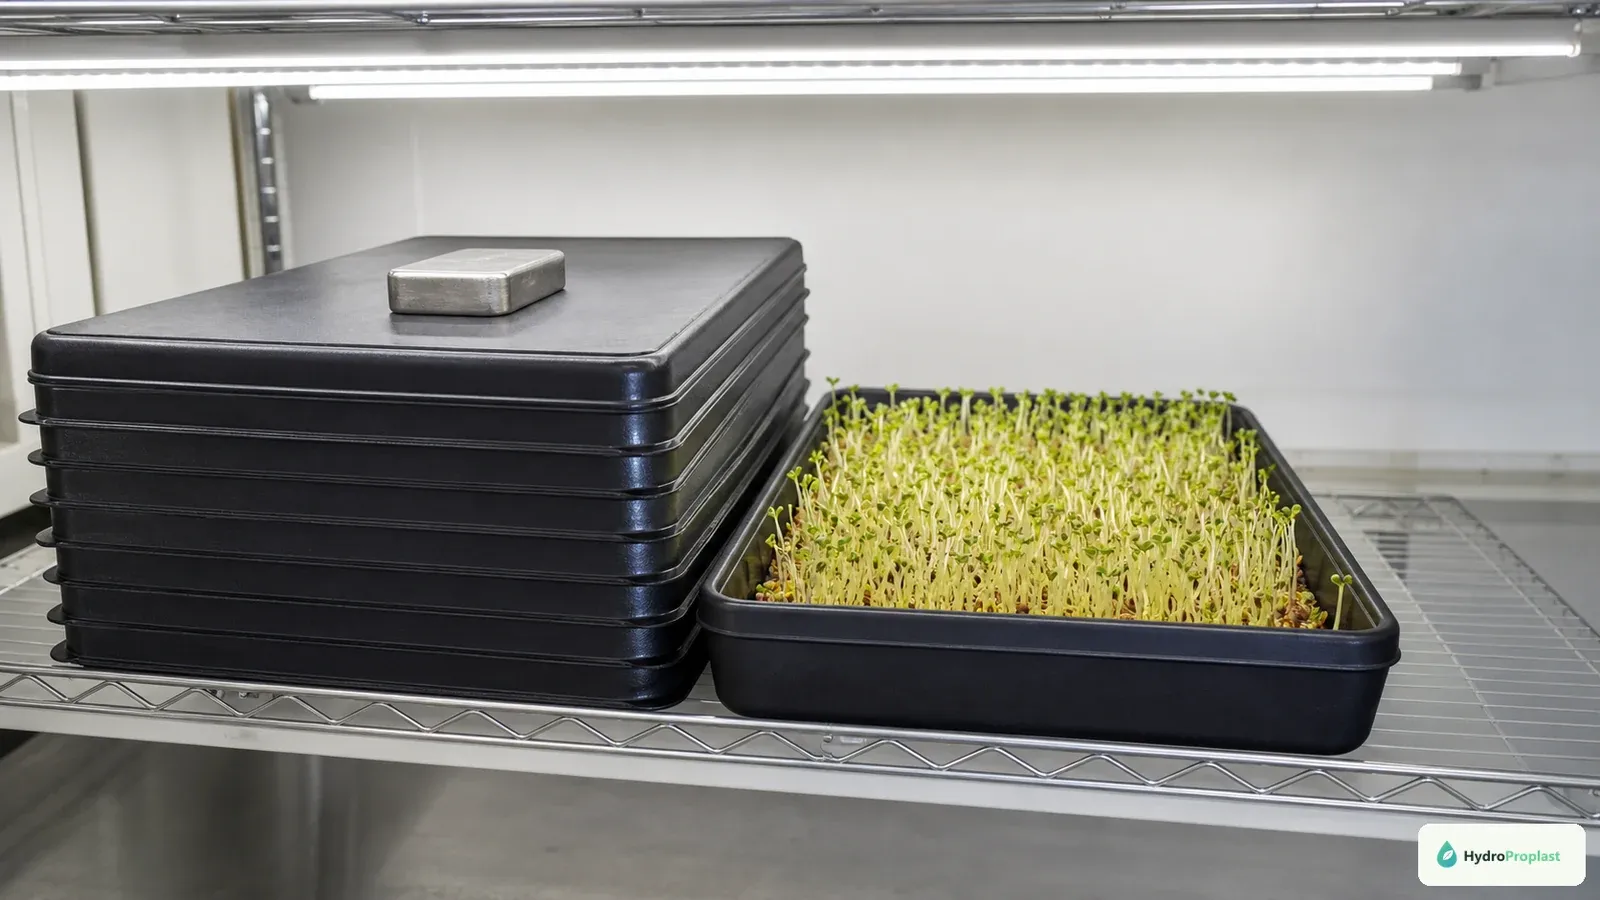
Use blackout or stacking only for a controlled early stage, then uncover seedlings promptly for light and airflow.
Some microgreens are germinated under a cover or weighted stack to maintain moisture and encourage uniform emergence. Duration and weight vary by species and room. Inspect daily for emergence, odor, pooling, and abnormal growth.
A covered tray still needs oxygen. Do not leave germinated seedlings compressed because a fixed calendar says so. Move to light based on crop development.
Provide uniform light
After emergence, supply even light across the tray. Weak light creates long fragile stems; excessive intensity or heat can bleach or dry the center. Use a fixture with a verified footprint and maintain a dark period.
Rotate trays only as part of a consistent plan. If rotation is necessary to hide poor uniformity, improve the fixture layout before scaling.
Water without saturating stems
Bottom watering can keep leaves and stems drier, but the support must drain and trays must not sit indefinitely in deep water. Lift or weigh representative trays to learn their use. Add measured water evenly.
Seed reserves support early growth, and nutrient needs depend on species, medium, and crop duration. Do not assume stronger fertilizer produces better microgreens. If nutrients are used, follow crop-appropriate guidance and maintain hygienic mixing.
Manage airflow and humidity
Provide gentle room airflow and enough spacing between trays for moisture to leave the canopy. A fan blasting directly across one edge creates uneven drying. Condensation, persistent surface wetness, and dense lodged stems indicate poor balance.
Measure temperature and humidity through the cycle. Crop-specific preferences vary; avoid universal exact settings.
Distinguish root hairs from mold
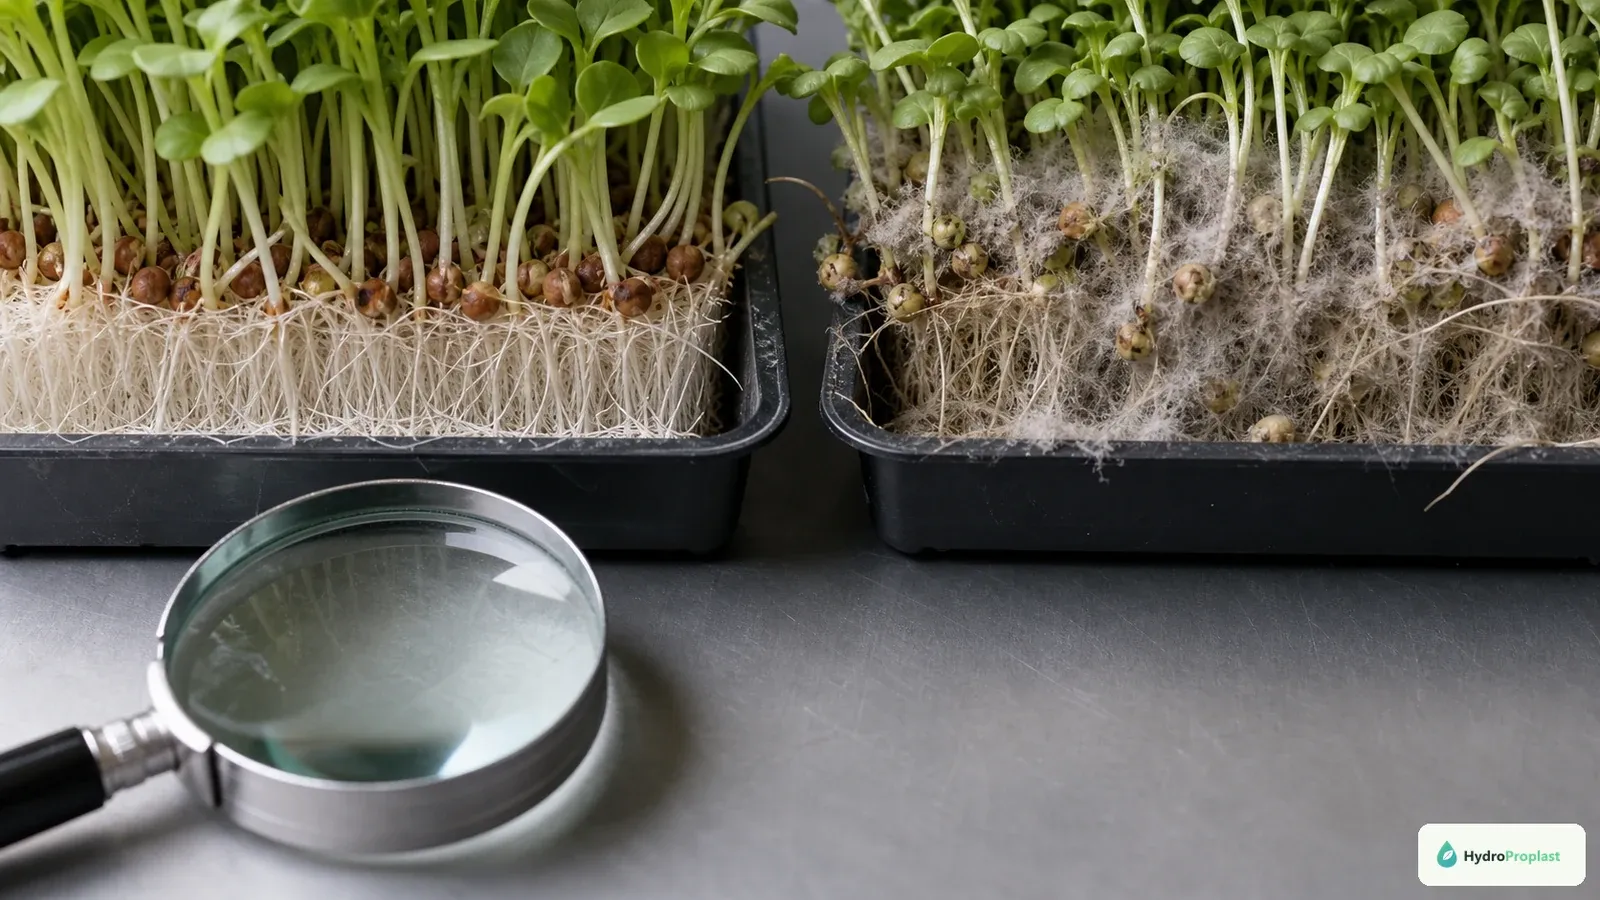
Healthy root hairs stay close to individual roots; mold forms irregular web-like growth that can bridge seeds and the mat.
Fine white root hairs cluster around roots and often disappear when wet. Mold may bridge seeds, spread across media, produce odor, or continue beyond the root zone. Observe with magnification and compare pattern and location.
When uncertain, isolate the tray. Do not taste questionable seedlings. Seek diagnostic or food-safety guidance for recurring growth.
Respond to damping-off and decay
Collapsed water-soaked stems, sour odor, spreading patches, or slimy seed indicate an unsafe failed crop. Discard the tray rather than harvesting around visibly affected areas. Protect nearby trays from splash and shared tools.
Review seed lot, density, soak, tray cleaning, moisture, temperature, airflow, and harvest timing. Do not spray an improvised fungicide on a ready-to-eat crop.
Harvest hygienically
Harvest when the species reaches the desired stage, using clean hands, tools, and food-contact containers. Cut above the media without dragging blades through roots. Keep rejected material separate.
Follow applicable local food-safety requirements for washing, drying, cooling, packaging, and storage. Microgreens have specific microbial risks; hydroponic production does not make them sterile.
Evaluate yield and quality
Record usable fresh weight, rejected weight, crop days, stem length, color, flavor, shelf life, and labor. High total biomass is not valuable when the tray is wet, dirty, uneven, or spoils quickly.
Calculate yield per tray and per day. Compare sowing densities one change at a time.
Build a repeatable tray cycle
Schedule sowing, emergence checks, light transfer, irrigation observations, harvest, washing, sanitation, and drying. Keep clean and dirty tray routes separate. Do not stack freshly cleaned trays beside harvested root mats.
Use the germination guide for general seed biology, but keep this crop’s dense edible-seedling risks in view.
Penn State Extension’s microgreens guide provides home-growing context. The U.S. FDA’s sprout safety guidance addresses a related but distinct high-risk seedling category; requirements depend on product and operation.
Start with one seed lot, one tray size, and one measured density. Uniform emergence, a dry clean canopy, hygienic harvest, and documented shelf life matter more than maximizing seed per tray.
Crop-specific commissioning and production notes:
Food-safety zoning: Separate seed storage, dirty tray return, washing, clean tray storage, sowing, growing, harvest, and finished-product handling as much as possible. Keep pets, soil, floor brushes, and personal items away. Commercial sellers must follow applicable food-safety, labeling, hygiene, and traceability requirements. Assign every tray a crop, seed lot, sowing time, density, soak treatment, and harvest date. If several trays from one lot show abnormal odor, decay, or poor germination, isolate that lot. Do not blend questionable trays into healthy product. Define discard criteria before harvest: mold beyond normal root hairs, slimy seed, sour odor, collapsed patches, pests, foreign material, or unverified chemical exposure. Do not cut around visibly unsafe areas without qualified guidance. Run measured low, medium, and higher-density trays with other variables stable. Record emergence, lodged stems, dryness, usable weight, rejects, and harvest time. Choose the lowest density delivering the desired uniform yield. Test shelf life in identical containers under intended storage. Inspect for condensation, odor, wilting, discoloration, and decay; never taste a questionable sample. Review whether failure began at seed, soak, blackout, light, water, climate, harvest, or storage. This matters because hydroponics gives the grower more control than soil, but it also removes some of soil’s natural buffering. A small error in water, light, air, or equipment can show up quickly when roots depend on a managed system. For HydroProPlast readers, the practical question is not only what is technically possible. The better question is what a beginner can run consistently without wasting money. Hydroponic Microgreens: Setup, Supplies, and Common Mistakes is a decision topic because it affects setup cost, maintenance time, plant health, and the type of equipment worth buying. This guide is written for global home growers, so it avoids country-specific product claims. Use the principles with the supplies available in your region, and treat any numeric range as a starting point that can vary by crop, nutrient brand, water quality, room temperature, and system design. ## Quick answer Hydroponic microgreens need shallow trays, clean seed, a suitable pad or mesh, moisture control, light after germination, and gentle airflow more than complicated nutrients. If you remember only one thing, remember that the right choice is the one that keeps the root zone stable and easy to inspect. A setup that looks impressive but is hard to maintain is rarely the best first option. This topic is best for apartment growers, kitchen gardeners, small rack systems, and beginners who want quick learning cycles. It is not the best fit for growers who cannot keep trays clean or who expect every seed type to behave the same way. That distinction matters because many hydroponic mistakes come from copying a setup that was designed for a different crop, room, or skill level. For searchers comparing products, the safest buying approach is to choose equipment by function. Look for the feature that solves the real problem, then compare size, durability, cleaning access, replacement parts, and how easily the item fits your system. ## How it works in a hydroponic setup Microgreens are usually grown on pads or mats in shallow trays. The crop uses seed energy early, then light and moisture drive short young growth before harvest. In soil, roots interact with a complex physical and biological environment. In hydroponics, the grower creates a simpler but more exposed environment. That is why small design details such as a covered reservoir, enough oxygen, and clean fittings can matter so much. The keyword idea behind this article is hydroponic microgreens. A reader searching for it usually wants a practical answer rather than a chemistry lecture or a product list. The useful answer combines how the system works, what can go wrong, what to buy carefully, and what to monitor after setup. A small 10 by 10 inch (25 by 25 cm) tray can teach moisture control better than a full rack, because you can see and correct mistakes quickly. This type of example is more useful than a universal rule because hydroponic systems vary. A countertop kit, a 5-gallon (19-liter) bucket, a vertical tower, and a greenhouse tray all behave differently even when the crop name is the same. For this topic, the useful supply categories are microgreen seed, shallow tray with holes, bottom tray, hemp or coco pad, spray bottle, LED light, small fan, and clean scissors. When comparing products, focus on practical criteria instead of marketing language. Check whether the item is easy to clean, sized for your system, made from materials suitable for wet growing, and simple enough to troubleshoot. If a part fails, leaks, clogs, or gives false readings, the plants pay for it first. Useful buying and setup criteria include: – seed quality – tray size – pad water-holding behavior – blackout needs – airflow – light distance – harvest timing Do not invent precision where you do not have it.
Retain photographs of representative clean and rejected trays so future operators apply the same written release criteria consistently.